Aug 30, 2017

Handmade Mixed Media Canvas Journal


It's time for a new challenge at Frilly and Funkie!  I'm so excited to be hostessing a challenge for the first time.  I've chosen the theme A Little Rusty.  With the end of summer nearing, some of us have gotten a little rusty with our creating due to holidays and lazy days.  For this challenge let's break out a rusty color palette in preparation for fall.  Whether you take the challenge literally and use rusted metal a faux rust technique, or just the color in your vintage or shabby chic project - the choice is up to you!  We can't wait to see your creativity in full swing!


I don't know about you, but I am always looking for a new surface to work with, any new substrate for my designs.  I struggled for several days trying to come up with something with no success.  In the end, I decided to make a canvas journal from scratch.  I won't go into the details on that for today's post, because there is far too much to say about the collage for one post...


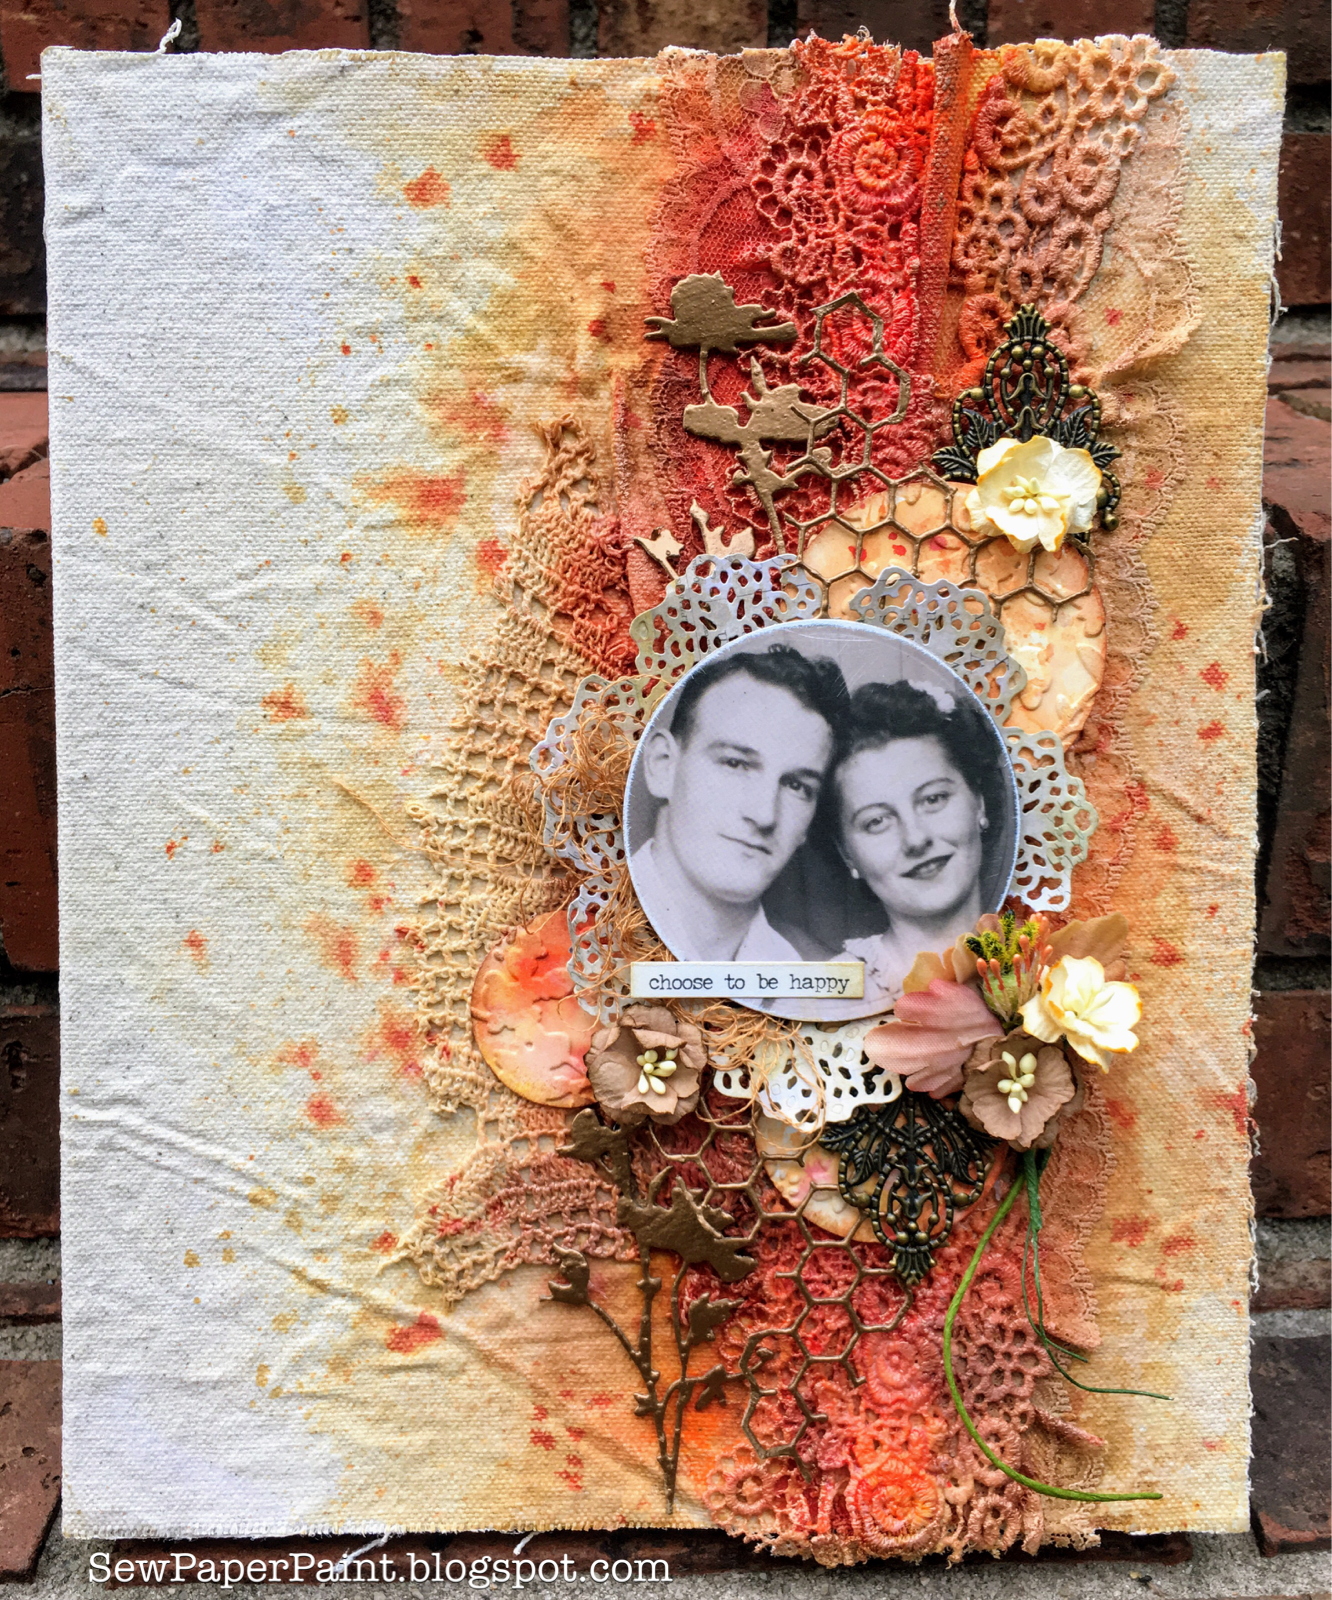
I used a variety of Distress Stains and Lindy's Stamp Gang sprays to color the layers of lace on my canvas cover.  I concentrated the color in one area, but also added some flecks to the white space for interest.  I dry brushed metallic paint onto the lace to highlight the raised areas.  I used a found relative photo (I'm sorry I don't know which collection this one is from because I jumbled mine together).  I used a circle die to cut out just the faces of the photo, then sanded the edges.  I layered with a die cut doily and some circles, which I embossed with a folder and inked with coordinating colors.


I knew I would be using this journal year round, so I chose embellishments that weren't fall themed, though it was difficult resisting adding some die cut leaves in the mix!  I added a set of filigree metal charms, a Prima flower, and two smaller Wild Orchid Crafts flowers, leaving the stems for interest.


This section of lace was crocheted by my dear friend Barbara's mother, how I cherish it!  I cut two wildflower dies and honeycomb dies from thin chipboard.  To coordinate with my brass charms, I embossed them with brass embossing powder.


Here are some details of the inked lace...


This shot shows the metallic paint highlights.


I can hardly mix any media without the addition of some bundled thread.  I finished off with a simple small talk quote.  And here's my finished journal, though you can hardly tell it is a book at all.  Check back soon for more details on assembly.  Thanks for visiting today and I hope you will play along with my challenge at the Frilly and Funkie blog!  Make sure to stop by and see the amazing projects from my teammates.


Don't forget you'll have a chance to win a $25 giftcard to the shop to buy these and other fine Funkie Junkie Boutique products just by playing along!  


Aug 29, 2017

Autumn Inspired Three-Fold Tag Holder Mini Album


Hello sweet ones!  I am thrilled to be sharing a peek of four gorgeous new fall dies from the latest Tutti Designs release.  I've combined all of the dies into one fun and easy project with a full tutorial on the Tutti Designs blog today.  The majority of paper used for this album is by Authentique.  It was so fun to work with!


It has been almost two years since I made one of these fun little albums, but when I realized that our Leaves Background die fit perfectly into one of the panels I knew this was the perfect album to showcase the dies.


Here's my ever growing collection of this type of album...


I can hardly believe my new challenge blog, Mini Album Makers, launches in just three short days!  I cannot wait to announce the team and share even more mini album creations with you!  Make sure to follow to be entered in the giveaway.  


Lastly, here are the links to the other three-fold albums I have made in case you want to see more details.


Make sure to check out the full Tutti Designs August release for even more product inspiration!


I'm sharing my fall album with:
You are invited to the Inlinkz link party!
Click here to enter

Aug 26, 2017

Darkroom Door Fern Stencil Cards


I can hardly believe the last days of summer are upon us!  I'm not at all ready to let go of summer.  I thought I had better share these summery makes with the new Darkroom Door Small Ferns Stencil while we are enjoying these last warm moments.


For this card, I made an inky background, then masked off portions of the stencil with tape and squished my Versmark ink pad into the stenciled design.


This process lends a stencil to work more as a stamp, which I love!  I did some gentle background stamping with the new Fine Leaves Stamp Set and French Script, all to create some subtle texture in the background.


I colored the parrots with markers DTR and gave them a light spritz of water before stamping.  They are layered over the Mesh Texture Stamp and a sentiment from Simple Sayings Vol. 2.


A simple embellishment of a Prima marbled flower and some loopy twine finished this one off.  


For this card I was trying to do CAS.  I painted a background panel with acrylics, then used a cosmetic sponge stencil in the ferns.  I cut with a TH die and layered onto a burlap panel.  This was very fun to make!  I love playing with paints and hope to more of this.


Do check out the Darkroom Door website to view all of the new releases and subscribe to the blog for inspiration overload!  :)  Thanks for visiting today, Autumn

I'm sharing my parrots with:
Feathers! for their beauty and grace

Aug 23, 2017

Eileen Hull House Die Journal Tutorial


In preparation for my new Mini Album Makers Challenge blog launch I have been doing a lot of sketching and scheming of new book concepts.  I hope you will take a moment to hop on over and become a follower!


I had just drawn out my ideas for a house shaped mini album when I saw the latest #Sizzix Makers Challenge using #EileenHull House Pocket die.  I didn't even know this die existed!  I quickly purchased one and set out to execute my mini album concept, with the simplicity of perfectly die cut pages.  Win win!


I've created a tutorial for binding your die cut houses into a little book.  If you aren't keen on mixed media, you could easily follow along and skip out on the additional media.  


To begin, cut eight of the largest house dies from watercolor card.  You will need two houses for each page.  They will be sandwiched around the flaps on your spine.  Cut four houses from thin chipboard for your covers.  Gesso the front and back of each chipboard panel.  (Gessoing the back helps minimize warping.)  This results in six overall pages, including the covers.


From the scrap watercolor card, cut the sections for your nestled spine.  The height of your spine will be 3.25" with three varying widths: 1.25, 1.75 and 2.25".  This will leave a .25" gap between your pages for ephemera.


Score all three sections 1/2" from each side.


You will need two drying racks or boards to lay each panel onto for drying.  Working in assembly line style this way will help speed things along.  Apply texture paste with a palette knife through a stencil onto the front side of your four gessoed chipboard panels.  I used two different stencil designs.


Apply crackle paste with a palette knife in thin layers randomly on the open spaces of the stenciled chipboard.


Apply crackle paste to two entire watercolor houses randomly.  These will coordinate with the stenciled chipboard for the opening spread.  Set your first six panels on one board to dry.


Use a variety of Sizzix embossing folders to emboss the remainder of your houses.


Apply more crackle paste randomly on the edges, open spaces, and as a highlight on the embossed panels.  Set these aside to dry.


Die cut several hearts and windows from the House Pocket die set from thin chipboard.  Cover with texture paste or thick goopy gesso.  Allow to dry.


Apply red line tape to the backs of your spine sections.  Don't get too close to the score lines.


Apply red line tape to the flaps on the front of your panels.  Again, don't get too close to the score lines.


Adhere the largest spine section to designer paper, or fabric.  I used a Tim Holtz ephemera card.  It was a little too thick and the score marks cracked.


Apply more red line tape over the flaps on the patterned side.


Once your panels have dried sufficiently to form the cracks in the crackle paste, begin to color them.  Tap a variety of Distress Oxide inks onto your kraft mat to create a palette.  With a wet brush, pick up inks and paint your houses.  Spritz with water to allow the colors to flow and bleed into the texture paste and embossed patterns.


Liquitex texture paste soaks up the ink.  DecoArt crackle paste resists the ink.  This will achieve a lot of color variation.  After your panels are painted, you can also dip them into color to add more interest.  I found using the brush worked best for the base layer to work the color into the cracks and crevices.


Now begin to adhere your pages to the spine.  Because the corners of this die are rounded at the bottom, I used the top angle as a guide for placement.  I found it easiest to get things square if I attached these upside down, but I am right handed.


It is important to have both sides aligned this way.  When you adhere the reverse sides of your pages together, use the houses as your guide, not your spine.  I used Beacon 3 in 1 glue to adhere them together, but the red line tape is important at the spine.


Once you have carefully determined placement of your pages and attached all of your front and backs to your signatures, then remove the tape on the centers and line them up, this time using the bottoms of the pages as your guide for placement.


Now you have a made from scratch mixed media album, ready to decorate!


When you open your pages you will see a white gap, but you can easily use more Distress Oxide to paint these, blending in with the colors on those particular pages.


The theme of my album is words of wisdom for making a happy home.  I used paper doll images from TH and computer generated sentiment strips to share these words of wisdom...  


I'm curious if you have any words of wisdom to share today.  Is there a secret you can share that has kept your home happy along the way?  I'd love to hear from you!  Perhaps I can start a second book with your words of wisdom.  :)


I would love to see your projects if you follow this tutorial, so please add a link in the comments section.  Don't forget to pin!


I'm sharing with:

Popular Posts